前言 非常感谢三根草堂 师父的Spring Boot系列教程,内容基本来源于三根草堂 师父,此笔记接上一篇SpringBoot-基础入门笔记(1)
Junit单元测试 添加依赖 1 2 3 4 <dependency > <groupId > org.springframework.boot</groupId > <artifactId > spring-boot-starter-test</artifactId > </dependency >
编写测试类 1 2 3 4 5 6 7 8 9 10 11 12 13 14 import com.sangeng.controller.HelloController;import org.junit.jupiter.api.Test;import org.springframework.beans.factory.annotation.Autowired;import org.springframework.boot.test.context.SpringBootTest;@SpringBootTest public class ApplicationTest {@Autowired private HelloController helloController;@Test public void testJunit () {System.out.println(1 ); System.out.println(helloController); } }
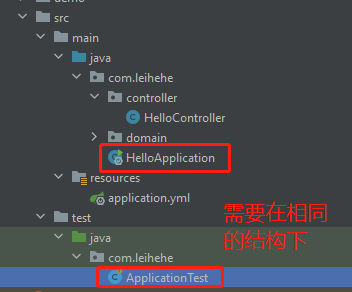
测试类需要和启动类在同一个包下(即相同的包结构),当然也可以指定Classes来指定启动类
兼容老版本 vintage依赖
1 2 3 4 5 <dependency > <groupId > org.junit.vintage</groupId > <artifactId > junit-vintage-engine</artifactId > <scope > test</scope > </dependency >
org.junit.Test对应的是Junit4的版本,就搭配@RunWith注解来使用。SpringBoot2.2.0之前版本的写法
1 2 3 4 5 6 7 8 9 10 11 12 13 14 15 16 17 18 19 import com.sangeng.controller.HelloController;import org.junit.Test;import org.junit.runner.RunWith;import org.springframework.beans.factory.annotation.Autowired;import org.springframework.boot.test.context.SpringBootTest;import org.springframework.test.context.junit4.SpringRunner;@SpringBootTest @RunWith(SpringRunner.class) public class ApplicationTest {@Autowired private HelloController helloController;@Test public void testJunit () {System.out.println(1 ); System.out.println(helloController); } }
Junit常见问题 如果Junit的Test Class没有放在和你的启动Class同一package格式下,会出现错误。
有两个解决方法
将Test Class放回与启动Class同一package结构下
在@SpringBootTest注释处指定Classses=你的启动类.class
1 2 3 4 5 6 7 8 9 10 11 @SpringBootTest(classes = HelloApplication.class) public class ApplicationTest { @Autowired private HelloController helloController; @Test public void testJunit () { System.out.println(1 ); System.out.println(helloController); }
Mybatis整合 创建database 我以mysql为例子,先给他导入数据
1 2 3 4 5 6 7 8 9 10 11 12 13 14 15 16 17 /*Table structure for table `user` */ DROP TABLE IF EXISTS `user`; CREATE TABLE `user` ( `id` int(11) NOT NULL AUTO_INCREMENT, `username` varchar(50) DEFAULT NULL, `age` int(11) DEFAULT NULL, `address` varchar(50) DEFAULT NULL, PRIMARY KEY (`id`) ) ENGINE=InnoDB AUTO_INCREMENT=10 DEFAULT CHARSET=utf8; /*Data for the table `user` */ insert into `user`(`id`,`username`,`age`,`address`) values (2,'pdd',25,'上海'), (3,'UZI',19,'上海11'),(4,'RF',19,NULL),(6,'三更',14,'请问2'),(8,'test1',11,'cc'), (9,'test2',12,'cc2'); /*40101 SET SQL_MODE=@OLD_SQL_MODE */; /*40014 SET FOREIGN_KEY_CHECKS=@OLD_FOREIGN_KEY_CHECKS */; /*40014 SET UNIQUE_CHECKS=@OLD_UNIQUE_CHECKS */; /*40111 SET SQL_NOTES=@OLD_SQL_NOTES */;
Java中创建entity 1 2 3 4 5 6 7 8 9 10 11 12 13 14 15 16 17 package com.leihehe.domain;import lombok.AllArgsConstructor;import lombok.Data;import lombok.NoArgsConstructor;@Data @NoArgsConstructor @AllArgsConstructor public class User { private int id; private String username; private int age; private String address; }
添加依赖 1 2 3 4 5 6 7 8 9 10 11 12 <dependency > <groupId > org.mybatis.spring.boot</groupId > <artifactId > mybatis-spring-boot-starter</artifactId > <version > 2.2.0</version > </dependency > <dependency > <groupId > mysql</groupId > <artifactId > mysql-connector-java</artifactId > <scope > runtime</scope > </dependency >
这里mybatis-spring-boot-starter的版本号需要指定,我们可以通过spring-boot-starter github 上的requirement 看到不同JDK和SpringBoot版本对应的mybatis版本号,这里我选择2.2.0
配置数据库信息 在yaml文件中写入数据
1 2 3 4 5 6 7 8 9 10 11 12 spring: datasource: url: jdbc:mysql://localhost:3306/SpringBootLearn?characterEncoding=utf-8&serverTimezone=UTC username: root password: 123456 driver-class-name: com.mysql.cj.jdbc.Driver mybatis: mapper-locations: classpath:mapper/*Mapper.xml type-aliases-package: com.leihehe.domain
Mapper文件 在resources里创建mapper文件夹/mapper.xml
1 2 3 4 5 6 7 <?xml version="1.0" encoding="UTF-8" ?> <!DOCTYPE mapper PUBLIC "-//mybatis.org//DTD Mapper 3.0//EN" "http://mybatis.org/dtd/mybatis-3-mapper.dtd" > <mapper namespace ="com.leihehe.mapper.UserMapper" > <select id ="findAll" resultType ="com.leihehe.domain.User" > select * from user </select > </mapper >
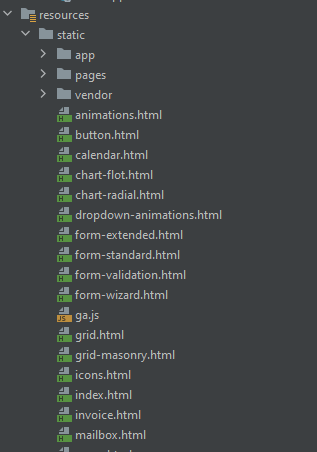
Web开发 静态资源
静态资源可以放到 resources/static (或者 resources/public 或者resources/resources 或者 resources/META-INF/resources ) 中即可。
静态资源放完后,例如我们想访问文件resources/static/index.html 只需要在访问时资源路径写成/index.html即可。
例如我们想访问文件:resources/static/pages/login.html 访问的资源路径写成: /pages/login.html
修改静态资源访问目录 在application.xml中修改
1 2 3 4 5 spring: mvc: static-path-pattern: /res/**
修改静态资源存放目录 1 2 3 4 5 6 spring: web: resources: static-locations: classpath:/abc
也可以设置多个static存放目录
1 2 3 4 5 6 7 spring: web: resources: static-locations: - classpath:/abc - classpath:/static
@RequestMapping请求映射规则 指定请求路径
@RequestMapping可以放在method上面,也可以放在Class上面path或者value属性都可以用来指定请求路径
1 2 3 4 5 6 7 8 9 10 11 12 13 14 @RequestMapping("/test") @RestController public class HelloController { @RequestMapping("/hello") public String hello () { return "hello" ; } @RequestMapping("/testPath") public String testPath () { return "testPath" ; } }
指定请求方式 1 2 3 4 @RequestMapping(value = "/testMethod",method = RequestMethod.POST) public String testMethod () { return "post" ; }
或者我们可以更简便一点:
@PostMapping 等价于 @RequestMapping(method = RequestMethod.POST)
指定请求参数 1 2 3 4 5 6 7 8 9 10 11 12 13 14 15 16 @PostMapping(value = "/testMethod",params = "a") public String testMethod () { return "post" ; } @PostMapping(value = "/testMethod1",params = "!a") public String testMethod1 () { return "post" ; } @PostMapping(value = "/testMethod2",params = "a=1") public String testMethod2 () { return "post" ; } @PostMapping(value = "/testMethod3",params = "a!=1") public String testMethod3 () { return "post" ; }
指定请求头 1 2 3 4 5 6 7 8 9 10 11 12 13 14 15 16 @PostMapping(value = "/testMethod",params = "a",headers = "deviceType") public String testMethod () { return "header" ; } @PostMapping(value = "/testMethod1",headers = "!deviceType") public String testMethod1 () { return "header" ; } @PostMapping(value = "/testMethod2",headers = "deviceType=ios") public String testMethod2 () { return "header" ; } @PostMapping(value = "/testMethod3",headers = "deviceType!=ios") public String testMethod3 () { return "header" ; }
指定请求头Content-Type Content-Type 可使用consume 来指定
1 2 3 4 5 6 7 8 @RequestMapping(method = RequestMethod.GET,value = "/testMethod",consumes = "multipart/form-data") public String testMethod () { return "ContentType" ; } @RequestMapping(method = RequestMethod.GET,value = "/testMethod1",consumes = "!multipart/form-data") public String testMethod1 () { return "ContentType" ; }
获取请求参数 路径参数
RestFul风格的接口一些参数在请求路径上。
比如/user/1,这里的1就是id
那么如果我们想获取路径上的参数,我们可以用@PathVariable来实现
1 2 3 4 5 6 7 8 9 10 @RequestMapping(method = RequestMethod.GET,value = "/user/{id}") public String testMethod (@PathVariable("id") int myID) { return "your id is " +myID; } @RequestMapping(method = RequestMethod.GET,value = "/user/{id}/{name}") public String testMethod1 (@PathVariable("id") int myID,@PathVariable String myName) { return "your id is " +myID+" and your name is " +myName; }
json参数
RestFul风格的接口中,一些复杂的参数会转换成json传参,那么我们可以用@RequestBody来获取数据
1 2 3 4 5 @RequestMapping(value = "/user",method = RequestMethod.POST) public String insertUser (@RequestBody User user) { System.out.println(user); return "insertUser" ; }
在POSTMAN中发送JSON内容:{"name":"leihehe","age":10}
多个用户数据:
1 2 3 4 5 @RequestMapping(value = "/multipleUsers",method = RequestMethod.POST) public String insertUser (@RequestBody List<User> users) { System.out.println(users); return "insert Users" ; }
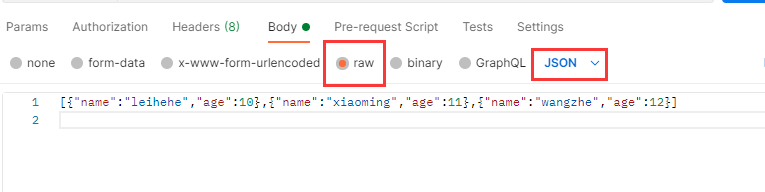
在POSTMAN中发送JSON内容:
[{"name":"leihehe","age":10},{"name":"xiaoming","age":11},{"name":"wangzhe","age":12}]
注意发送的时候要选择json
QueryString参数 什么是QueryString参数? 格式类似于/users?name=leihehe&age=11
可以使用@RequestParam来获取QueryString格式的参数
如何获取? 若请求参数和我们方法里的变量名一样,则不需要@RequestParam
1 2 3 4 5 6 7 @RequestMapping("/testRequestParam") public String testRequestParam (int id, String name, String[] likes) { System.out.println(id); System.out.println(name); System.out.println(Arrays.toString(likes)); return "requestParam" ; }
若请求参数和我们方法里的变量名不一样,需要@RequestParam
1 2 3 4 5 6 7 @RequestMapping("/testRequestParam") public String testRequestParam (@RequestParam int id, String name, String[] likes) { System.out.println(id); System.out.println(name); System.out.println(Arrays.toString(likes)); return "requestParam" ; }
实体获取:
1 2 3 4 5 @RequestMapping("/testRequestParam") public String testRequestParam (User user) { System.out.println(user); return "requestParam" ; }
URL: 127.0.0.1:8080/testRequestParam?id=1&name=shulei&likes=xuexi&likes=xitou
相关注解其他属性 required 代表是否必须,默认值为true也就是必须要有对应的参数。如果没有就会报错。false
1 2 3 4 @RequestMapping("/testRequestParam") public String testRequestParam (@RequestParam(value = "name",required = false) String name) { return "requestParam" ; }
defaultValue 如果对应的参数没有,我们可以用defaultValue属性设置默认值。
1 2 3 4 @RequestMapping("/testRequestParam") public String testRequestParam (@RequestParam(value = "name",required = false,defaultValue = "aaa") String name) { return "requestParam" ; }
查询用户接口 Controller->service(interface)->mapper(interface)->resources/mapper.xml
service(interface)<-serviceImp
接口相应格式 1 2 3 4 5 6 7 8 9 10 11 12 13 14 15 16 17 18 19 20 21 22 23 24 25 26 27 28 29 30 31 32 33 34 35 36 37 38 39 40 41 42 43 44 @JsonInclude(JsonInclude.Include.NON_NULL) public class ResponseResult <T> { private int code; private String msg; private T data; public int getCode () { return code; } public void setCode (int code) { this .code = code; } public String getMsg () { return msg; } public void setMsg (String msg) { this .msg = msg; } public T getData () { return data; } public void setData (T data) { this .data = data; } public ResponseResult (int code,String msg) { this .code=code; this .msg=msg; } public ResponseResult (int code,T data) { this .code=code; this .data=data; } }
前端发送请求 我们需要用到Axios 和Vue.js
在html中添加如下代码
1 2 3 4 5 6 7 8 9 10 11 12 13 14 15 16 17 18 19 20 <script src ="https://cdn.jsdelivr.net/npm/vue@2/dist/vue.js" > </script > <script src ="https://unpkg.com/axios/dist/axios.min.js" > </script > <script > var v = new Vue ({ el :"#app" , created ( this .fetchAllUsers (); }, methods :{ fetchAllUsers ( axios.get ("http://127.0.0.1:8666/user/findAll" ).then ((res )=> { console .log (res) }) } } }) </script >
跨域请求 什么是跨域 在使用XMLHttpRequest对象发送HTTP请求的时候,必须遵循同源策略
CORS解决跨域 CORS是Cross-origin resource sharing的全称,允许浏览器跨源发送XMLHttpRequest请求,从而克服AJAX只能同源使用的限制。
它通过服务器增加一个特殊的header(Access-Control-Allow-Origin)来告诉客户端跨域的限制,如果浏览器支持CORS并且判断Orgin通过的话,就会允许XMLHttpRequest发起跨域请求。
Springboot使用CORS解决跨域请求 方法一:@CrossOrigin 直接在想要跨域请求的method或者Class上加@CrossOrigin
但是这个方法有缺陷,会添加很多注释
1 2 3 4 5 6 7 8 9 10 11 12 @Configuration public class CorsConfig implements WebMvcConfigurer { @Override public void addCorsMappings (CorsRegistry registry) { registry.addMapping("/**" ) .allowedOriginPatterns("*" ) .allowCredentials(true ) .allowedMethods("GET" ,"POST" ,"DELETE" ,"PUT" ) .allowedHeaders("*" ) .maxAge(3600 ); } }
前端渲染 1 2 3 4 5 6 7 8 9 10 11 12 13 14 15 16 17 18 19 20 21 22 23 24 25 26 <script src ="https://cdn.jsdelivr.net/npm/vue@2/dist/vue.js" > </script > <script src ="https://unpkg.com/axios/dist/axios.min.js" > </script > <script > var v = new Vue ({ el :"#app" , data :{ users :[] }, created ( this .fetchAllUsers (); }, methods :{ fetchAllUsers ( axios.get ("http://127.0.0.1:8666/user/findAll" ).then ((res )=> { console .log (res) if (res.data .code ==200 ){ this .users =res.data .data ; } }) } } }) </script >
1 2 3 4 5 6 7 8 9 10 11 12 13 14 15 16 17 18 19 20 <div class ="table-responsive" > <table class ="table table-striped table-bordered table-hover" > <thead > <tr > <th > 学号</th > <th > 姓名</th > <th > 年龄</th > <th > 地址</th > </tr > </thead > <tbody > <tr v-for ="user in users" > <td > {{user.id}}}</td > <td > {{user.username}}</td > <td > {{user.age}}</td > <td > {{user.address}}</td > </tr > </tbody > </table > </div >
Reference 三根草堂 师父的Spring Boot系列教程